Using the command (or prompt) line with intermediate commands

This is part of the content I learned during my first week of the Makers Academy Pre-course, and as such, writing this posts are a way of reviewing what I have learnt and hopefully helping other people which are also trying to get into the tech industry.
Streams and pipelines
A basic concept in programming is what we call streams, which refers to the flow of information or data (inputs and outputs) that are happening in a computer or program. Computers have a minimum of three “standard streams”:
- Standard input (stdin): It is a stream from which a computer reads the input data. An example would be what you type on your keyboard that your computer can read and interpret. Imagine we give our computer the command
find - Standard output (stdout): It is a stream to which the the program writes out what’s considered its main output. For example, the information you can see on your monitor. Following the previous example, when we use the command
find, it will write out the paths to the located files to standard output. - Standard error (stderr): It is a stream used that is traditionally used for things like error messages - things that you might not want mixed with your main output. It is separated from the standard output, so we can control its flow independently. Our command
findwill write out earnings that it cannot access a directory to standard error.
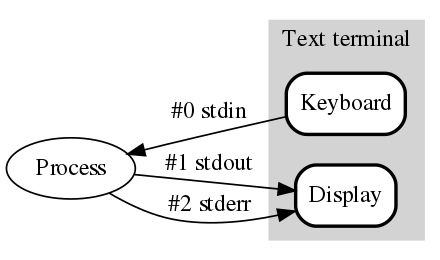
Image sourced from: Wikipedia
It is very important to understand this flow of information as that would allow us to redirect it, for example, getting a second program to take as its input, the output of a first program using what we call a pipeline (|).
According to Wikipedia: a pipeline consists of a chain of processing elements (processes, threads, coroutines, functions, etc.), arranged so that the output of each element is the input of the next.
And what do you need pipelines for? I can hear you ask. Pipelines can also be very helpful when using the command line, to direct the output of a command to the input of another command. If you are not too familiarised with the command line and the basic commands, I recommend you visiting this link to learn the basics before carrying on.
I know it all sounds very complicated, but let me ilustrate it.
Using some examples from the previous post, remember the command grep, that finds a pattern in a file of our choice, so we could do:
grep 849* Numberplates | cat > "numberplates.txt"
This command will look for a pattern starting in 849 within a “Numberplates” file and then send the output that we would normally see on the screen directly to the cat command. This last command will create a text file containing the output we obtained from grep.
find . -name "*.txt" | grep "someFile" | wc -l
The previous command will find files ending in “.txt” and pass them to grep as an input. Grep will check amongst those files and find the ones that include “someFile”. The output from grep will then be redirected to wc -l that will list a count of how many results we have.
There are other ways of redirecting streams which don’t require a pipeline sign. The first example I gave you is actually overcomplicating things, we could get the same result by doing it slightly different:
Instead of grep 849* Numberplates | cat > "numberplates.txt", we can do grep 849* Numberplates > "numberplates.txt", since the > symbol implicates that we are directing the output of grep into a new file “numberplates.txt”.
We can also use >> as redirection, which also writes to a file, but unlike >, it appends rather than clearing out the file altogether each time we use it. This can be really useful for monitoring, for example if you are collecting logs!
You can compare the results of running the following commands to see the difference:
echo "First line" > test1.txt
echo "Second line" > test1.txt
echo "Third line" > test1.txt
cat test1.txt # Should output only the last line
echo "First line" >> test2.txt
echo "Second line" >> test2.txt
echo "Third line" >> test2.txt
cat test2.txt # Should output all three lines
We can also redirect different streams into different targets. We know the number for our standard output is 1 and for the standard error is 2, and that our command find outputs problems when accessing a file into the standard error. We could use the following to create and fill in a text file that contains the error messages from this command:
find / -name "someFile" 1> /dev/null 2> errors.txt
In the above case, the standard output (where the search results end up) is redirecting to “nothing” (/dev/null), meaning that it doesn’t show up anywhere, and the standard error, where the access errors appear, is redirected to a file called errors.txt, so that we can have a list with the errors it comes accross with.
We can even redirect using a file as an input for a command. So both of the commands below would have the same result:
cat somefile | wc -l
wc -l < somefile
We have thousands of combinations of different commands, and you can play and experiment with them as much as you like, but be careful not to remove (rm) anything important!
Permissions
I am sure you have come across with a window on your computer asking you for administrator permission when installing a new program. This is because there are different kinds of permissions to access or modify files, and I will show you how to see this permissions and work with them.
In this post I will be describing the permission system for POSIX systems, as Windows does have a completely different model. You can read more about Window’s permission system here.
Each element in the filesystem, whether it’s a file or a directory, has user ownership and group ownership. This ownership determines who the user permissions and the group permissions apply to. While a user can belong to several different groups, every object in the filesystem is owned by only one user and group
There are three types of classes for each file within a unix-based system, and each of this classes has three different permissions: read, write and execute.
- Class “User”: Every file in our system has one and only one user, which is the owner of the file.
- Class “Group”: Permissions given to a group of users. Every user can belong to several groups of users.
- Class “Others”: This class contains all users that don’t fall into any of the previous categories.
Because permissions over files and over directories vary slightly, I am going to explain each one separatedly:
Permissions over files
Permissions:
- “Read”: This permission allows for a file to be read.
- “Write”: It allows to modify a file
- “Execute”: It allows to execute a file, for example to run a program. If you have “execute” permission over a directory, you will be able to access and change the files it contains, but you will not be able to see the files within it unless you also have a “read” permission.
- Take into account that permissions in Unix are not inherited, which means that the fact of having “read” permission over a directory doesn’t mean you have “read” permission over the files it contains.
Permissions over directories
-
“Read” permission means that you can list what contents the directory has, but you cannot change this contents in any way.
-
“Write” permission means that you can create/delete/move/copy/rename contents of that directory. Take into account that without accompanying read permission, you’d need to make your changes blind as you wouldn’t be able to tell beforehand what the directory contains).
-
The “execute permission” means that you can access the contents of the directory for anything that those things permit you to (e.g. if you can read permission to directory, but not execute permission, then the command
lsthat lists the files within will give us an error; and if you have write permission, but not execute permission, then creating any files in that directory will fail). By extension, as we mentioned earlier, in order to do anything in the file system, you need to have execute permissions on all the driectories from the root to where you want to do that something; if you don’t have that permission on even one thing in the path, then you cannot access anything below that point.
You can see the permissions over your files using the command ls -l:
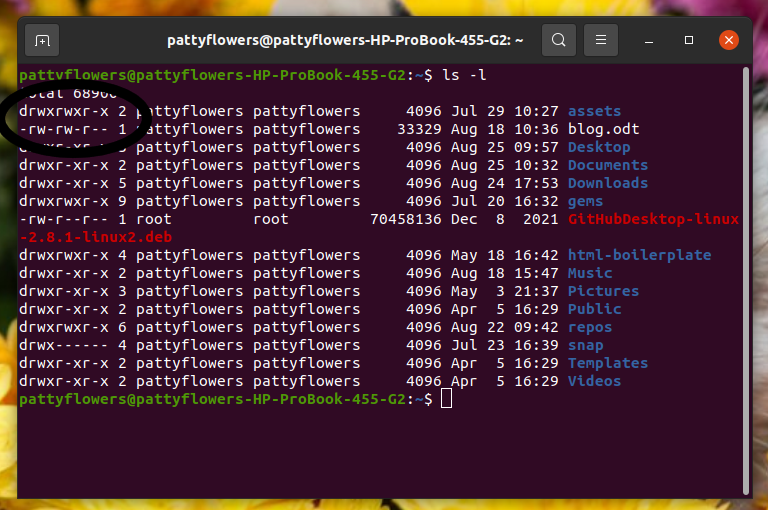
Within the circle you can see the permissions for two files. It is quite difficult to interpret if you don’t know what you are looking at, but you will understand it quickly enough!
The format in which this permissions are written is as follows: Type of file + User permissions(read,write,execute or rwx) + Group permissions(read, write, execute or rwx) + Others permissions(read, write, execute or rwx).
On the first line we see dwrxrwxrwx: the “d” means that the file is a directory. The first wrx after it would be the “User permissions”, the fact that the three letters are present means that the “User” has the three permissions (read, write and execute) over that file in particular. The same happens with the “Group” and the “Others” permissions, you can see that they are also there: d rwx rwx rwx
Now, lets have a look at the second file, we can see: -rw-rw-r--. The first hyphen means that the item is a regular file on disk (if it was an l, this would incidate symbolic links, like the Windows shortcuts but at a filesystem level). Then we have the “User” permissions rw-, here we see that the execute permission (x) is not there. The same happens for the “Group” class. For the “Others” class, the only permission we have is to read the file (r)
How to change permissions
The command we use to change permissions is chmod. Look at the following example:
chmod g+r myfile.txt
With the previous command, we are giving the “Group” class a write permission over the file “myfile.txt”.
- For this command, “u” stands for “User”, “g” for “Group” and “o” for “Other”.
- ”+” means we are adding a permission, ”-“ means we are removing a permission.
- As before, “r” stands for read, “w” stands for write and “x” stands for execute.
So, imagine we want to remove all permissions for the “Others” class over the file “privateDiary.txt”. We would use the following command: chmod o-rwx privateDiary.txt
You can make sure the permissions have changed as you wanted using the ls -l command again.
Superuser mode (“root”)
Image property of Dreamstime

“Superuser mode” sounds like some kind of superpower, and it is actually not very far from reality. Being a superuser means that you have the rights and permissions over all the files and directories on your computer. Sounds fun, doesn’t it?
But you need to be extremely careful when you are making changes on the computer from the “Superuser mode”, as a simple typo on a command you introduce can cause significant damage. That is why it is recommended to work as a normal user and just get the extra permissions only when you need to, this way, it is much less likely to cause problems on your computer.

To run a particular command as a superuser, you only have to type the sudo prefix and write the superuser password as required.
For example, if you need to install a program and need Superuser privileges you would write sudo exampleProgram install
Environmental variables and profile files

If you are going on a walk in the forest and I asked you what your environment looks like, you would describe the trees and animals, the path and what the air smells like, but also in which county or estate and country it is located.
The same way, a computer has an environment it works within. We can have a peak at what we call “Environmental variables” (or “env var” to make it shorter), by using the command env.
For example, this is the environment on my computer:
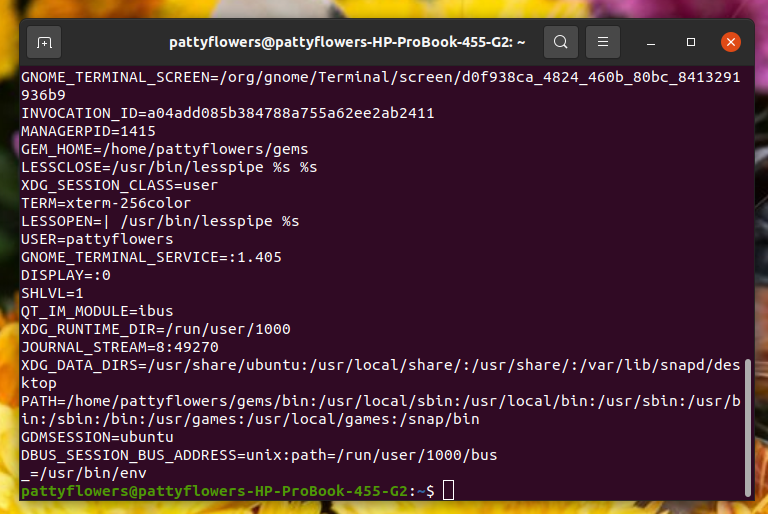
You can see that every line consists of a key-value pair, for example on the first line, it would be GNOME_TERMINAL_SCREEN=/org/gnome/Terminal/screend0f938ca_4824_460b_80bc_8413291936b9. GNOME_TERMINAL_SCREEN would be the key and /org/gnome/Terminal/screend0f938ca_4824_460b_80bc_8413291936b9 would be the value.
Every single program you run on your computer has access to some of this env vars, which helps it understand the environment it is working in. If you want to find any single environmental variable, you can use the command echo $ENV_VAR (ENV_VAR reffers to the key we talked about, for example echo $HOME or echo $GNOME_TERMINAL_SCREEN).
one of the standard environment variables is $SHELL, which gives you the path to the executable of your current shell. So if you are not sure of what you are running (bash, zsh, fish can look very similar to one another) you can run $SHELL --version which will expand into something like /bin/zsh --version or /bin/bash --version, which will then give you a full name of the one you’re running.
Unfortunately, environmental variables only last until the end of the current shell session, and then they disappear. If we want these variables to be present for all our sessions, we will need to use profile files.
Profile files are files that exist in your home directory and dictate what your environment will look like when you and start a shell session. The shell reads it if it is present or skips it otherwise. Some things that these “Profile files” do would include setting environmental variables or setting PATH variables.
For clarification, a shell is a program that reads, understands and executes the commands the user enters in the computer. It is sometimes also called an interpreter.
Lets create a new env var with the following command: export PLANET=earth, and verify it exists in your computer with the command echo $PLANET. If you now open a new terminal window and try running echo $PLANET again, you will see that it is nowhere to be found, this is because it is an environmental variable.
To avoid this, we can run the following commands:
- Zsh:
echo "export PLANET=earth" >> ~/.zshrc - Bash:
echo "export PLANET=earth" >> ~/.bash_profile
This will create a “permanent” environmental variable. Now if you open a new terminal window and access the profile file, this variable should still be there.

And this is it! Now you know some more advanced commands to work with. Until next time, have a happy day and happy coding!