Version control

This is part of the content I learned during my first week of the Makers Academy Pre-course, and as such, writing this posts are a way of reviewing what I have learnt and hopefully helping other people which are also trying to get into the tech industry.
Close your eyes and imagine living in a videogame. You can save whenever you want and keep as many saved games as you desire if you prefer not to overwrite them. At some point, you have to fight a dragon that is several levels over you and after a couple of attacks your character dies. If you die on real life… well, that’s it, you do not get second chances, but if you had saved your game, you could go back to where you were just before and try in a different way.

That is more or less what version control does. You can save your work, and each time you save it, it creates a new save point that you can return to at a later point if you need it. You can also carry on with different saved games simultaneously to see how things would be if you did different things on each of them. Once you know which one you prefer, you can either combine all of the different games (called “branches”) you have saved to have a combination of all, with all the items you have acquired and all your achievements or just opt to carry on with one of them. But that is not all, it also allows you to “play” remotely with other people on the same game and combine your efforts.
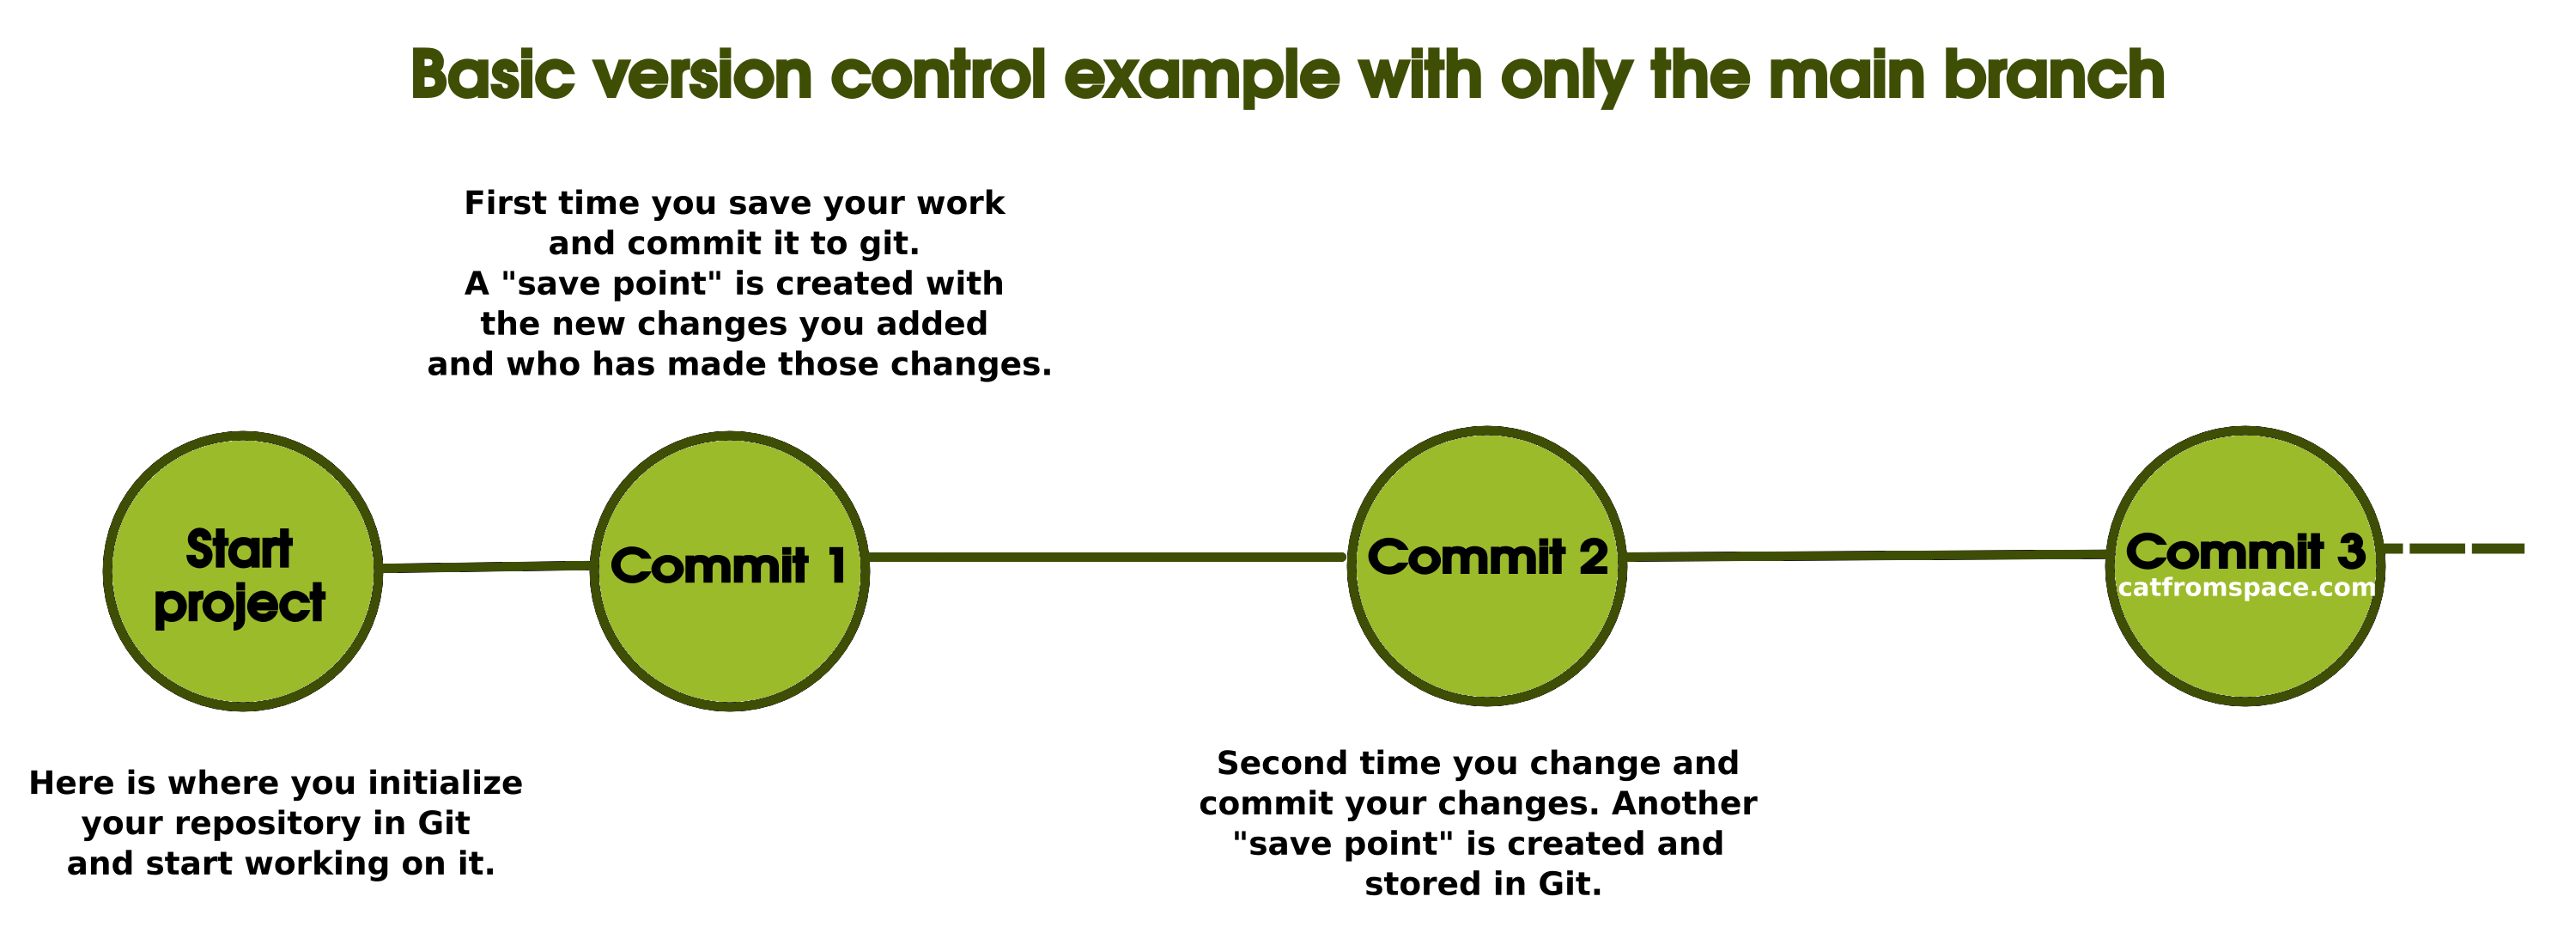
Version control is a way of saving and keeping track of our work, being able to see what changes have been made at a certain point in time and who made them, allowing us to go back to where those changes where made if suddenly something stopped working and we cannot figure out what was wrong.
So, knowing all that version control can do for you, I guess the question is, why wouldn’t you use it?
It may all seem a little complicated to start with, when you could just be saving your files with names like “Mywork1”, “Mywork2”, “MyworkfFnal”, “MyworkFinalForRealThisTime”, “MyworkFinalJustOneMoreChangeIPromise”…
No, seriously, it is worth the initial effort to understand it and get used to the workflow, it will make your life so much easier and save your back in more than one occasion.
So, were do we start?
Git and GitHub

Git is the most used version control system at the moment, and it will do everything we need in order to keep our work safe and make it easier to work with other people on the same project. It is basically a tool that saves your work in something that resembles a timeline.
GitHub is a hosting platform or website for developers all around the world to store their code and colaborate. You will need a personal account to be able to use this platform, and within this account you will be able to see all your “repositories” (your projects or the folders they are stored in), the different “commits” (the points where you have saved your work) and who is working in that project with you amongst other many things.
This article explains how to set up Git and GitHub: https://www.theodinproject.com/lessons/foundations-setting-up-git
The best way to work with Git and GitHub is through your command-line. If you don’t have a clue of what that is, please visit the basic and intermediate articles referring the command-line to get more familiarised with it.
There are a few commands you will need to use constantly while using version control on your work.
Find your repository and use git status
Firstly, and it sounds very obvious but you will find yourself forgetting it all the time: you need to be in the directory (or folder) that has been initialized as a repository and contains the project you are working on before you can work on it from the command line.
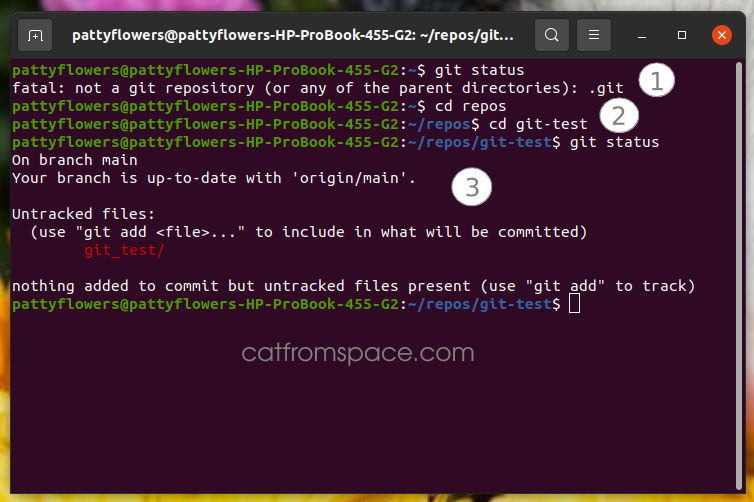
Look at the image above.
-
In this line I have used the command
git status, which gives us an idea of the files that have been changed and what is yet to be committed. When I press enter, it gives me the errorfatal: not a git repository(or any of the parent directories): .git, it is basically telling me that I am not in the right directory to work with git. -
Using the command
cd *directory*as we saw on the previous posts, we can move into the correct directory, in my case the directory “git-test” which is inside the directory “repos”. -
If we try
git statusagain, we see that this time, something different happens, and it is giving us some information about a file that has been changed and even about what command to use next.
Git add, git commit and git push
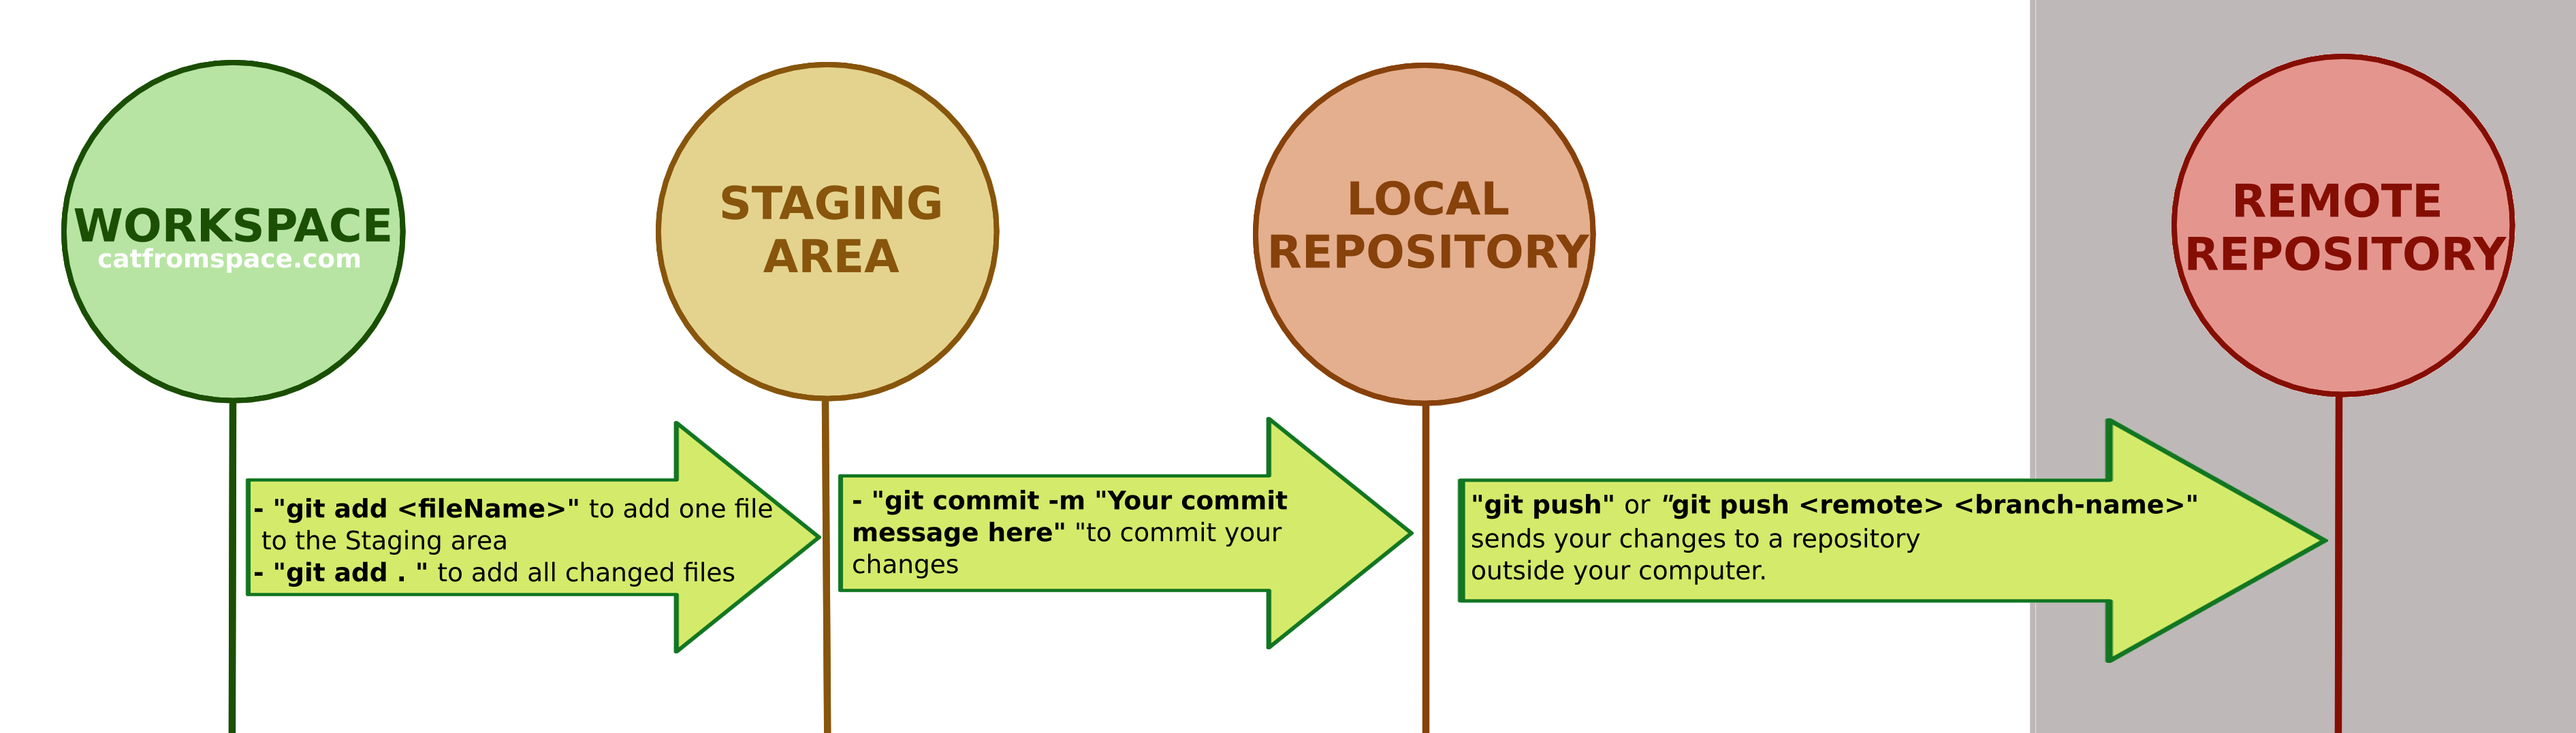
In the previous image we have four main spaces:
-
Workspace: Is the area where you are working and making changes on your files. Imagine you are working on a new and super exciting novel about teenage shiny vampires and from time to time you save your text document.
-
Staging area: Is an area where we send the changed files that we are planning to commit with the next commit we do. It is like a “waiting room” for files that are waiting to be committed. It is independent from the action of saving your document on your computer, so you can save as many times as you want before you add this file to the Staging area, where the changes you have made so far will be stored temporarily.
-
Local repository: Is the copy of the repository or project you are working on that exists in your computer. Once you commit the changes you have made, these changes will be updated in your local repository, but they will not be available yet in the cloud. If your computer catches fire, you can say goodbye to your novel!.
-
Remote repository: Is the copy of your repository that exists in the cloud. You will need to “push” your changes from your local repository to the remote repository so that these are available anywhere. Once you have done that, if your angry ex-partner decides to throw your computer off the window, your novel will be completely safe and you will be able to download it (or “clone” it) from the new fancy computer you have just bought.
Now we have an idea of what different areas our files travel to before reaching the remote repository, but we still need to learn the basic commands to move files around. The three most basic commands and the ones you will find yourself using more often will be:
| Command | Description |
|---|---|
git status |
As we said earlier, this will give us an idea of what our “working tree” looks like. What changes are staged and which aren’t, as well as about the “branch” we are on. We will discuss “branches” later on. |
git add <filename> |
Will add the desired file to the staging area |
git add . |
It will add ALL modified files to the staging area. |
git commit -m “your commit message goes here” |
This command will commit the changes that were staged and add them to your local repository. Your commit message should describe what change or changes have been made and be written in imperative form (instead of “Fixed typos” you will write “Fix typos”) and be relatively short, so if you find yourself writing very long messages, think of committing your work more often with only small changes. Read more about how to write good commit messages on this post. |
git push |
This command will send your committed changes to the copy of your repository that is on the cloud. Your work is now safe! |
git pull |
It is used to get the updates that have been made to the remote repository and merges them with your local repository |
git clone “SSH or HTTPS address” |
It creates a copy of a remote repository in your local repository |
Branching
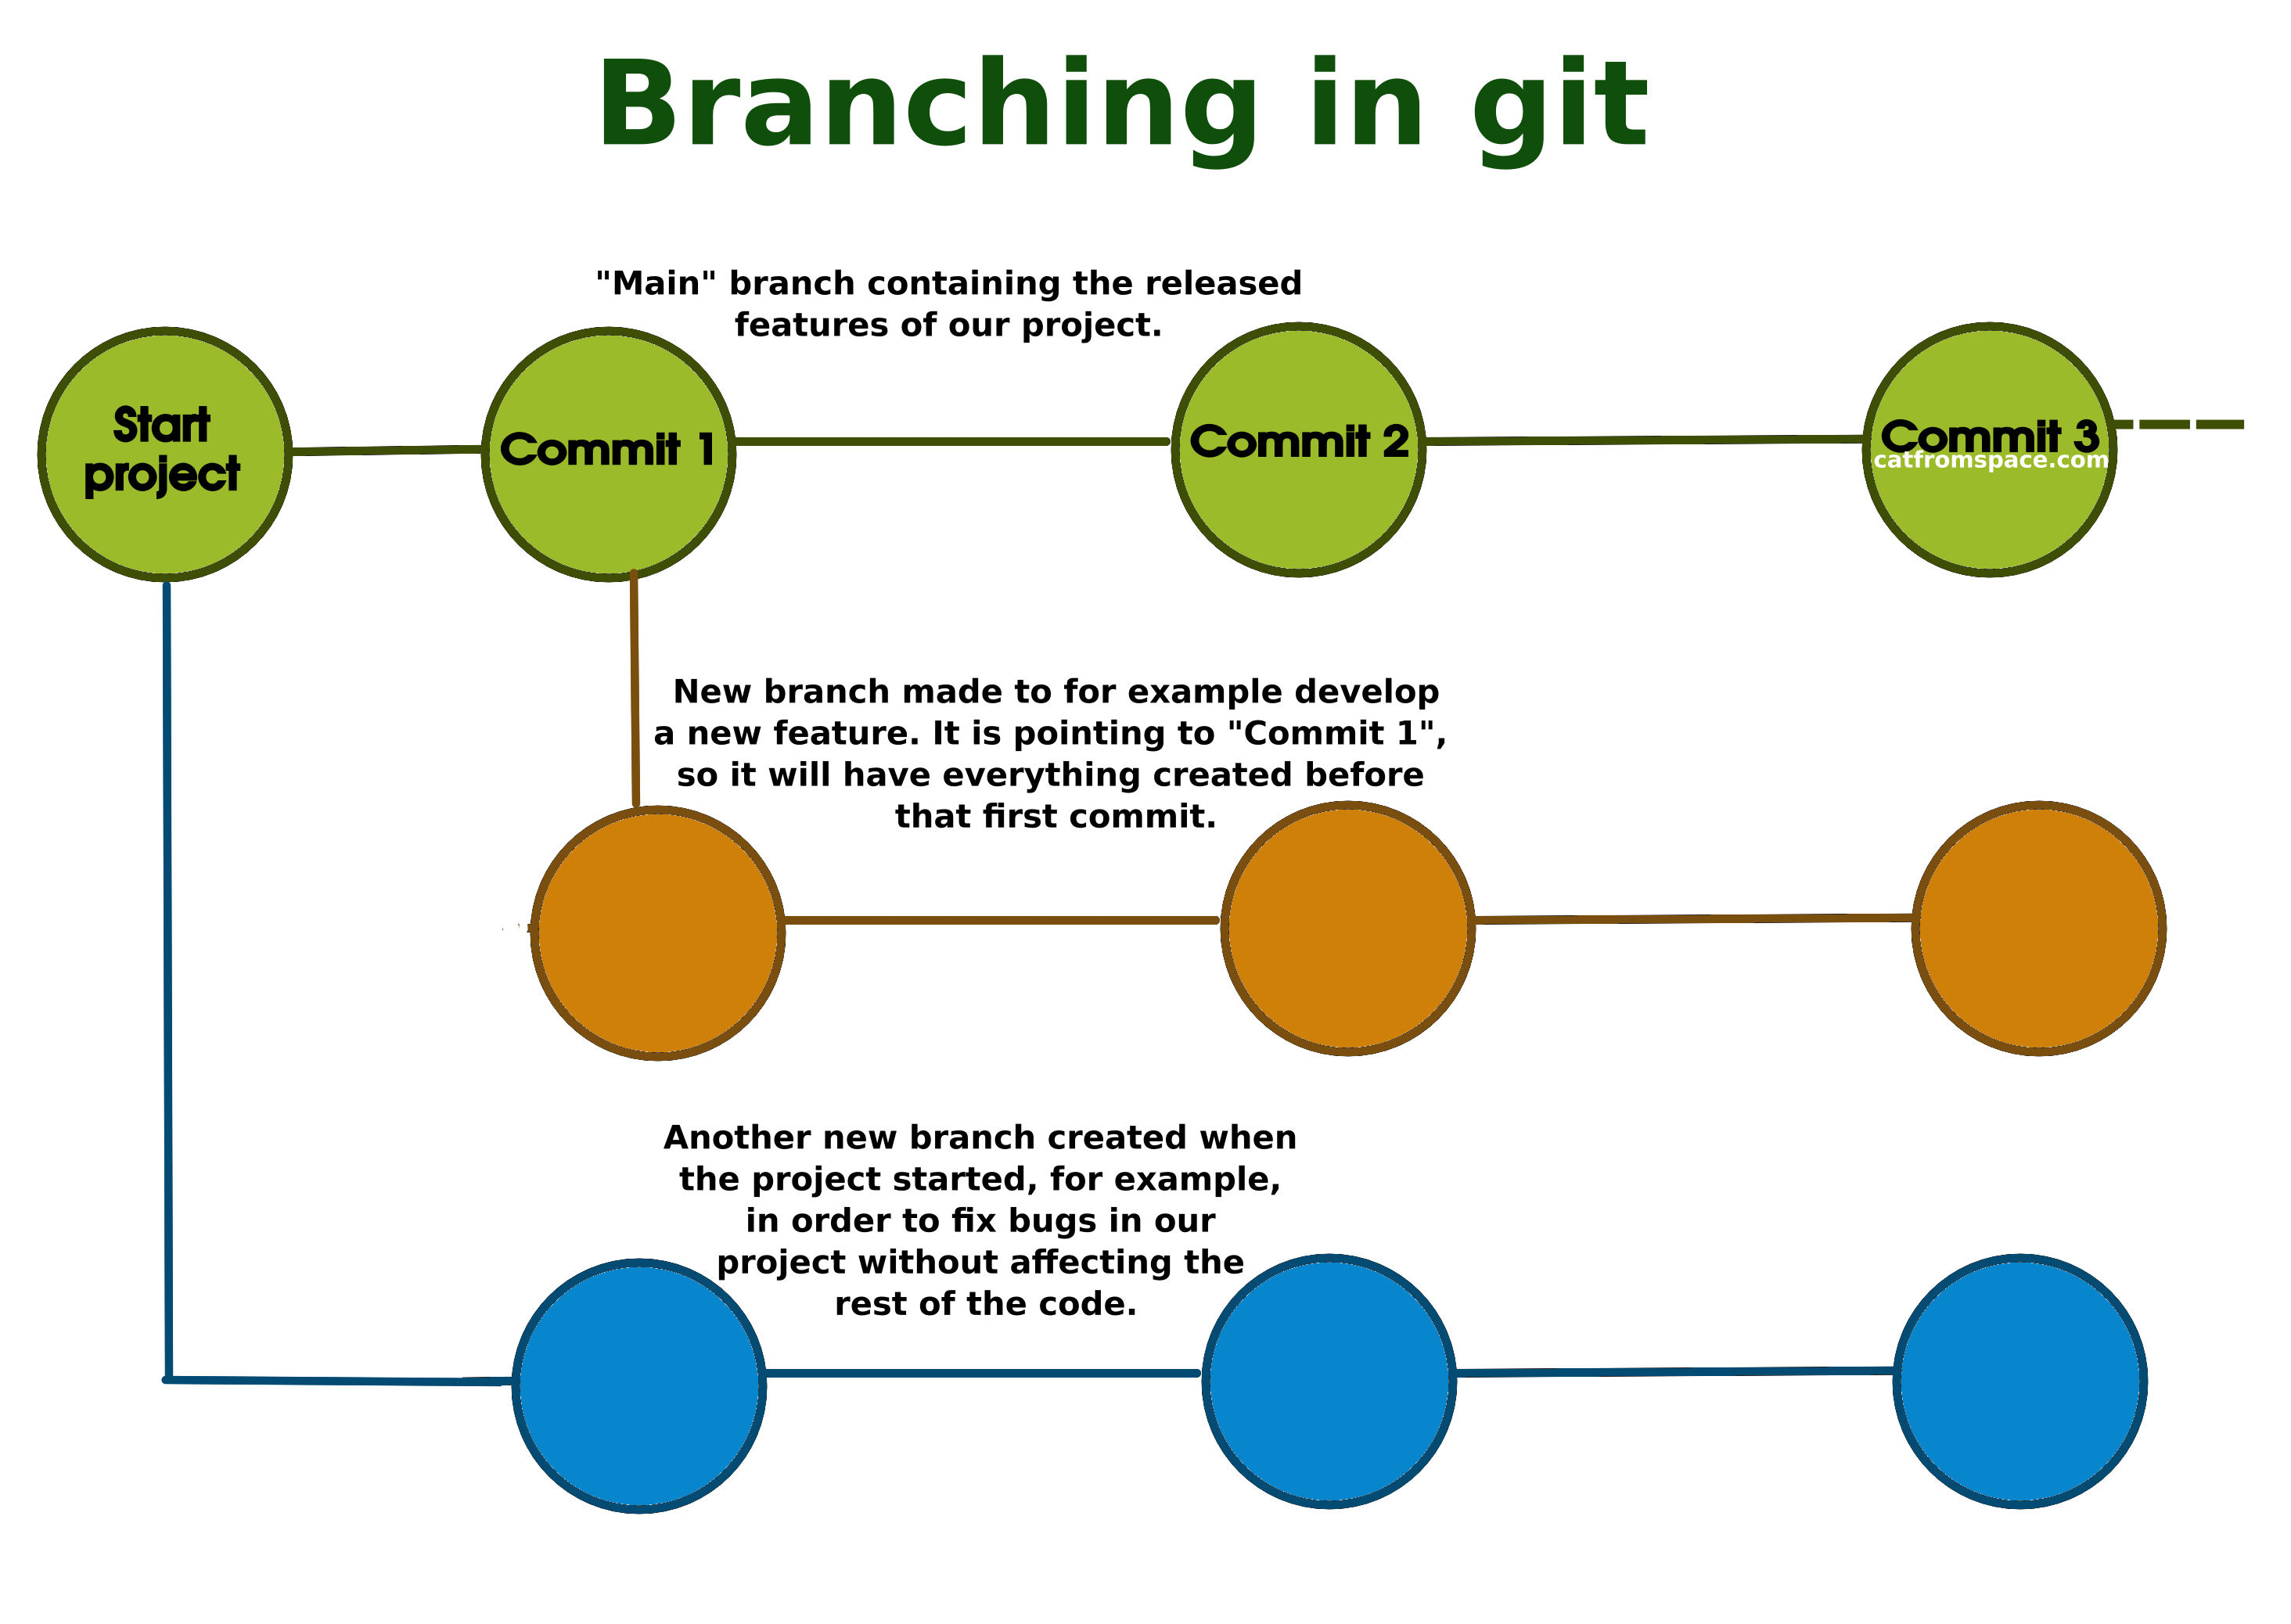
So lets imagine the simplest possible situation. You have set up Git and GitHub and start a project, work on it and carry on with the flow of saving your work (as you would normally with any document, for example pressing Ctrl + S) and then committing it (using git add + name or git add . an then git commit -m “your commit message between quotes”). If you didn’t want to create any parallel workflows, what we call “branches”, you could just carry on doing that until your project is completed working on your “main” branch.
But working on your own on a little project is entirely different to, let’s say, working at a big company with lots of other people. This enormous project also has a “main” branch, where the finished and working parts of the project are, but you would certainly not want the new junior software developer pushing their code (likely having some bugs and problems) directly into this main branch. Another example would be, imagine you are working on new features for your project, but these will take quite a few months to complete. If you work on the “main” branch, this will mean that there is unfinished code just standing there. For all these reasons, git has branches. A branch is basically a parallel reality from the one existing in the “main” branch, where you can do what you want without the risk of damaging anything.
There are a few basic commands you want to know in order to work with branches:
| Command | Description |
|---|---|
git branch |
Lists all the existing branches or create a new branch if we add a name |
git branch -a |
Lists all the existing branches including the remote ones |
git branch -d “name of the branch” |
Delete a branch |
git checkout “branchName” |
You can switch to the desired branch |
git checkout -b “newBranchName” |
You can create a new branch and change to it |
git merge “branchName" |
Merges the changes you have made into the current branch |
There are many, many more commands we can use in Git, but I don’t want to make this too complicated. If you would like to dive more into this topic, here are some interesting resources:
-
Git and GitHub have a lot of their own documentation explaining all their features and giving step by step guides. You can find some here
-
You have lots of videos about these topics, which explain in a simple and entertaining way all the concepts you need to know. You have some here and here

I hope you enjoyed this post. Using Git can be a bit difficult at the beginning, but it soon becomes like a second nature, so please don’t give up too soon!